Authors: Nicholas Gans and Olalekan P. Ogunmolu.
LAB 1: Introduction to the Cyton ARM
Table of Contents
- Objectives
- Goals
- Video Example
- Tasks
- Procedure
- Numerical Configuration
- Numerical Configuration / Joint Angle Control
- Guide Mode Movement
- Report
- Demo
- Grading
Objectives
In this lab, you will get familiarized with the Cyton Arm Robai Robot, the home configuration of the manipulator, using the numerical manipulator configuration diallog (otherwise known as the slider) as well understand using the guide mode for controlling the robot arm.
- The goals of this lab are as follows:
- Move the Cyton using the Numerical Manipulator Configuration Dialog/Slider
- Send the Cyton to the home configurations using Numerical Manipulator Configuration Dialog/Slider
- Demonstrate sequence of motions like pick and place of objects (small wooden blocks)
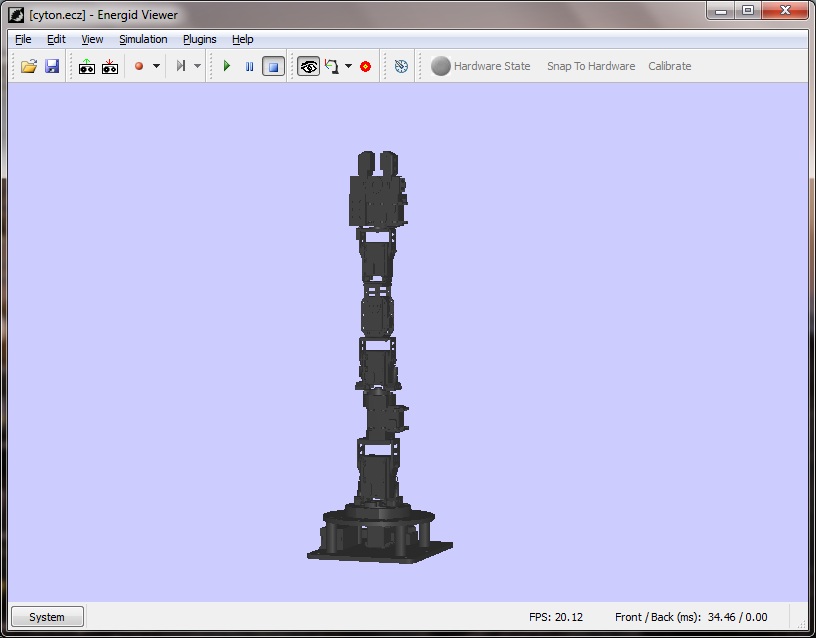
Fig 1.1 - The cyton UI enviroment
Video Example
Please watch the video below to get familiar with the Cyton configuration.
Video 1 - An example configuration of the Robai robot.
Tasks
You would work in grouped cohorts as determined by the roster. Each cohort is expected to program the cyton in picking and placing wooden blocks which you are going to be supplied with. You have leeway in what you want the robot to do but we generally expect you to be able to stack the wooden blocks on one another.
Procedure
- Ensure you read all Lab 1 Instructions in their entirety.
- Turn on the Cyton arm by connecting the AC adapter.
- Connect the Cyton arm to the computer using the USB cable.
- Open Cyton-Viewer.exe.
- Make sure the
Hardware Stateindicator is green. If it is red, click it to toggle. - Click on the
Numerical Manipulator Configurationin the CytonViewer toolbar (see Fig. 1.2). - Experiment with the arm, using the Numerical Configuration Dialog to move the motors that drive each axis of the robot.
- Observe that the Numerical Configuration will display a joint position value for each motor you move.
- These numbers correspond to encoder measurements of the angle of each motor axis. By default, the slider will move each servo (motor).- Desired joint position values can also be entered in directly by typing in the
Joint Positionfield. - When the user opens Cyton Viewer without hardware, it initializes to the default hardware home position. However, if hardware is present, the viewer simulation will initialize to the current pose of the hardware.
- Observe that the Numerical Configuration will display a joint position value for each motor you move.
- Move the joints using the Slider to become familiar with the Numerical Manipulator Configuration/Slider
- Click on the
Guide ModeButton in the CytonViewer toolbar. Experiment with the arm, using Guide Mode to direct the pose of the end effector. - Using the Movement Recording capabilities, along with the Numerical Configuration Dialog and/or Guide Mode, program the robot to pick up several blocks and move them to new locations. Try stacking blocks.
- The first and final robot pose should be the home configuration (seen in Fig. 1.1).
- Demonstrate your program to your TA or instructor
Refer to the detailed descriptions below for more information.
Numerical Configuration / Joint Angle Control
This is a straightforward way of controlling the Cyton arm by directly setting desired joint angles.
Steps
- Click on the Numerical Manipulator Configuration Icon (Fig 1.2)
- The Manipulator Config (a.k.a. Slider) dialogue window appears
- Change the values of servos/motor and move the robot
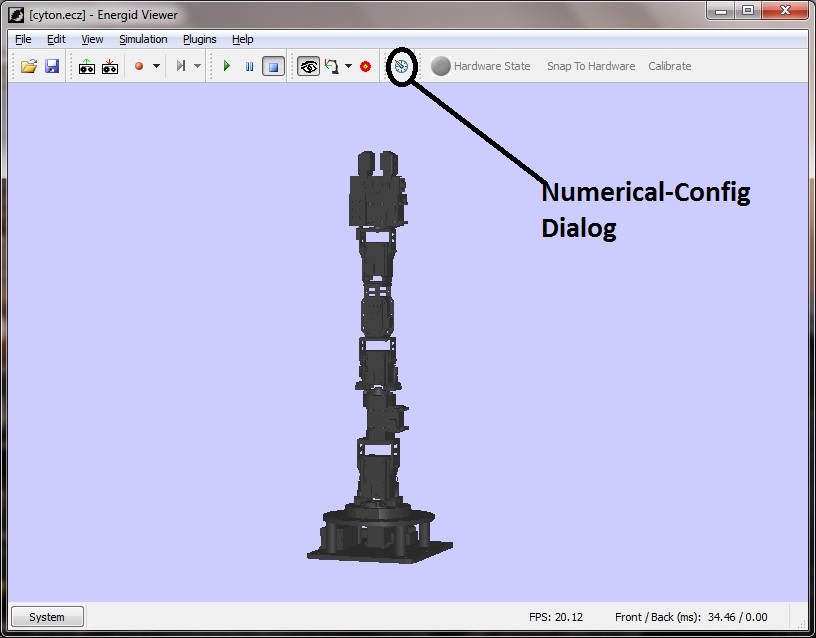
Fig: 1.2 – Numerical Manipulator Configuration Button
Guide Mode Movement
This is a simple way of controlling the Cyton arm by directly choosing the desired position and/or orientation of the gripper.
Steps
- Click the Guide Mode (Guide Frame) button (Fig 1.3).
- Make sure
Wrist Rollis selected underEnd Effector. If it is not an option to select, select it underAvailable Linksand click<<Add. - Clicking
Editwill allow you to change parameters of the current frame. - Setting the Type to
pointEndEffector(the default) will allow the gripper to have arbitrary orientation to be at the origin of the frame. - Selecting
frameEndEffectorwill enforce the gripper to have the same orientation as the frame. - Press the
Run Simulationbutton in the toolbar (Fig 1.4) to put the simulation in Play mode. - Holding the left mouse button and moving the mouse will move the Guide Frame to different (x,y,z) positions. The Cyton arm moves to keep the wrist at the origin of the frame.
- Holding the right mouse button while moving the mouse will rotate the frame. If it is set to frameEndEffector, the gripper will rotate.
- Note that some frame positions and/or orientations may not be physically achievable for the robot, in which case the robot will stop moving until the guide frame is brought back to a feasible location.

Video 2: Guide Frame Control
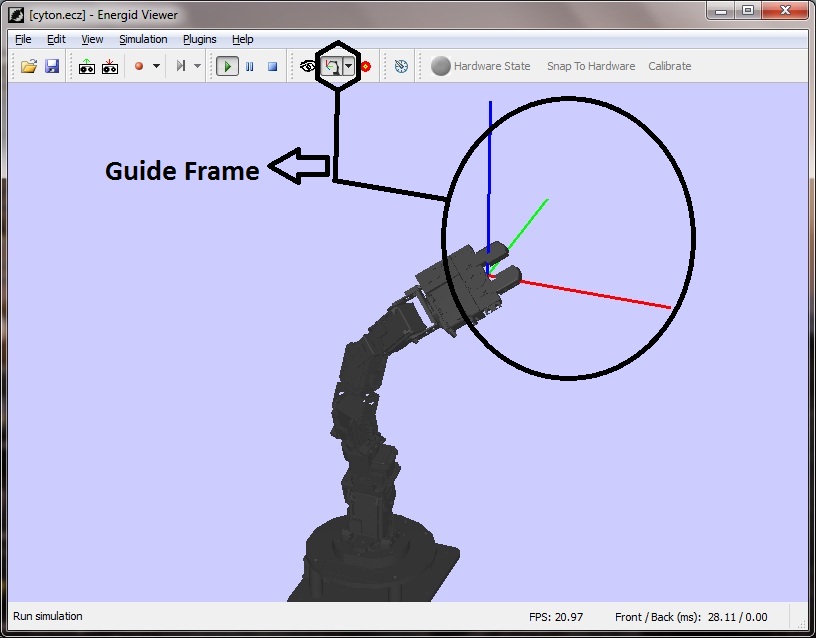
Fig 1.3 — Guide Frame On End Effector
Recording Movements
One method to program the robot using Cyton Viewer is to record a motion sequence. The general process is to turn on Record Mode, move the Cyton arm as desired, turn off Record Mode, and save the recorded motion to a path file. This is very similar to the process followed for industrial robots in manufacturing.
Video 3: Robai Playback
Follow these steps:
- Click the Record Mode button to begin recording
- In the dropdown menu beside the Record Mode button, choose either GuideFrame mode or Joint Mode. Recording in joint mode will record the exact value of each joint at each time sample. Recording in GuideFrame mode will record just the end-effector position and pose and let the Cyton Viewer software determine an efficient set of joint values during playback.
- Program the robot’s motion by moving the robot using the Guide Frames or Joint Angle Sliders.
- The system will record all data while “Run Simulation” is pressed. Pressing “Pause Simulation” means the robot will not move while you set desired joint angles, but also ensures that the system does not record intermediate motions or lapses. This works well if you predetermine your needed joint angles. Do not hit “Stop Simulation” or close the “Numerical Manipulator Configuration” until you are completely done with your program. This will end the recording. If the program is not complete, you will have to start over.
- Click the “Save Path” file button (Fig 1.4) and choose a name for the .xml file
- Load path using the “Load Path” file button in toolbar
- Press the Path Playback button and “Run simulation” buttons to play the recorded path. There may be some delay, particularly when using client computers and/or virtual machines.
Fig 1.4 — Important Buttons in CytonViewer
- The “View Mode” button allows you to change the viewpoint of the simulation by dragging the mouse. The “Change Center of Interest” button allow you to alter the direction the viewpoint is looking by dragging the mouse.
Report
None required.
Demo
Show your TA or instructor the sequence of motions your team has programmed.
Grading
Grades will be pass/fail, based entirely on your demo.